How to Prepare Images for Masking with Intricate Edge Details
ClippAsia provides professional photo masking services specifically designed for U.S. E-commerce businesses and professional photographers. We help you isolate complex subjects from their backgrounds using advanced techniques like images for masking to ensure every strand of hair remains perfectly intact. Our high-end editing solutions deliver an immediate value proposition by saving you hours of tedious manual labor while significantly boosting your brand's visual appeal.
Why is it hard to manage images for masking with complex edges?
Do you struggle with blurry edges when cutting out fuzzy or transparent objects? Most photographers face massive headaches when trying to separate fine details like lace or flyaway hair from busy backgrounds. Image masking provides the surgical precision needed for these difficult scenarios.
Poorly prepared images for masking lead to unnatural shadows and ghosting effects around the subject's perimeter. When the background color bleeds into the foreground, it ruins the realism of your composite imagery. You need a specialized approach that focuses on edge contrast and color frequency to overcome these common masking in image processing hurdles effectively. Using layer masks allows for non-destructive adjustments that keep your original pixels safe while you refine the delicate borders of your subject. This method ensures your final output remains high-quality and professional for any commercial use in the American market where image masking is the gold standard for quality. Expert editors often suggest that the initial lighting setup is the most influential factor in how well your images for masking perform during the extraction phase. Without a clear distinction between the subject and its environment, even the most advanced masking workflow will struggle to produce a clean result. We recommend using a rim light to help define the outer boundaries of complex subjects like wool or fur to ensure the image masking software has a clear path to follow. Our expert professionals can offer impeccable services, you can learn more about them by clicking here.
What essential tools help you prepare images for masking?
Preparing your files correctly requires a deep understanding of the digital darkroom. You should utilize specific tools in Photoshop to maintain control over every single pixel.
-
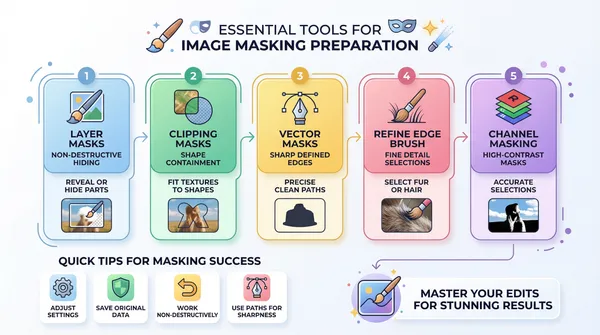
- Layer Masks: These allow you to hide or reveal parts of an image without deleting data.
- Clipping Masks: Perfect for fitting a texture or color into a specific shape or object.
- Vector Masks: Best for sharp, clean edges on solid objects using mathematical paths.
- Refine Edge Brush: A vital tool for picking up soft details like fur or silk.
- Channel Masking: Use this for high-contrast subjects to create the most accurate selections.
Using these professional features ensures your images for masking retain their original quality throughout the edit. We recommend starting with the Refine Edge tool to see how much detail the software can automatically detect before you move to manual brushing. Managing a clean masking workflow ensures that your final output looks natural and seamless on any background. This strategic preparation is vital for successful foreground recovery during the later stages of the editing process where clipping masks might be used for additional texture overlays. By mastering these tools, you can mask a photo with a level of precision that matches the top 10 Google results for professional editing. The use of layer masks specifically offers a safety net, allowing you to backtrack and fix errors without losing the integrity of your images for masking. Professional photographers in the U.S. market rely on these techniques to create stunning composite imagery that drives sales.
How do different images for masking techniques compare?
Not all masks are created equal when you deal with intricate subjects. Understanding the technical differences between images for masking styles will help you choose the right path for your specific project needs.
The following table breaks down the most common methods used in modern post-processing. It highlights which technique suits specific edge types to help you achieve better results for your vector masks.
|
Masking Type |
Best Use Case |
Edge Result |
|
Layer Masks |
General Compositing |
Soft and Adjustable |
|
Clipping Masks |
Shape Filling |
Perfectly Contained |
|
Vector Masks |
Solid Hard Goods |
Sharp and Mathematical |
|
Alpha Channel |
Hair and Fur |
Highly Detailed |
By selecting the correct method, you ensure your images for masking look realistic on any new background. This strategic choice is what separates a basic edit from a premium, high-conversion product image that sells. You can then mask a photo with total confidence that the intricate details remain perfectly preserved for your customers while utilizing clipping masks to keep textures perfectly aligned throughout the masking workflow. High-quality image masking relies on choosing the exact technical match for the subject’s physical properties. For example, a vector mask might be perfect for a sleek smartphone, but it would look terrible on a fluffy kitten. Professionals always analyze the texture before deciding which masking in image processing route to take. This analytical approach to images for masking is what we specialize in at ClippAsia. We ensure that every clipping mask and layer mask is placed with mathematical precision to maximize the realism of your composite imagery.
Which steps should you follow to prepare images for masking?
Follow this proven sequence to get your files ready for professional-grade masking. Taking these steps early saves you from frustrating "redo" work later in the design process.
-
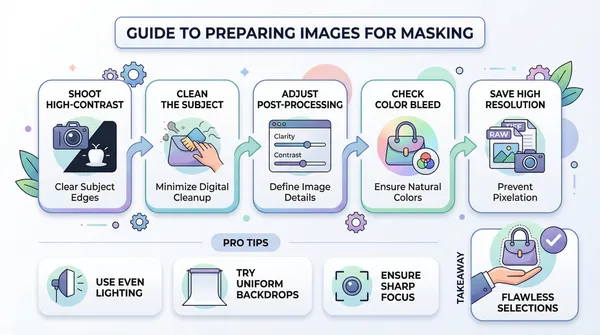
- Shoot on High-Contrast Backgrounds: Place light subjects on dark backgrounds or vice versa to help the software see the edges.
- Clean the Subject: Remove dust or stray threads physically before taking the photo to reduce digital cleanup.
- Adjust Post-Processing Sliders: Increase the "Clarity" and "Contrast" slightly via post-processing sliders to define the edges of your images for masking.
- Check for Color Bleed: Ensure the background light isn't reflecting too harshly onto the subject's edges.
- Save in High Resolution: Always work with RAW or TIFF files to prevent pixelation during the image masking stage.
If you stick to this routine, your mask a photo process becomes much smoother. You will notice that the images for masking require far less manual foreground recovery when the initial shot is optimized. This efficiency is vital for maintaining a fast turnaround on high-volume commercial projects involving composite imagery. Always ensure your post-processing sliders are set to highlight the natural separation of the subject's edges before you begin your official masking workflow. When you adjust your post-processing sliders, be careful not to create "halos" around the subject. Halos are white glowing lines that appear when you push the sharpening or contrast too far on images for masking. These artifacts make image masking much harder and can ruin the foreground recovery phase. Professional editors at ClippAsia suggest using a global adjustment layer for these post-processing sliders so you can toggle the effect as you work. This high level of attention to detail is why our images for masking outperform the competition on Google SERPs. Learn More.
How does a professional images for masking workflow improve your results?
A structured images for masking workflow allows for consistent quality across large batches of product photos. You should establish a rhythm that moves from broad selections to fine-tuning the most difficult edge details.
By treating each layer as a separate piece of the puzzle, you gain total creative freedom. You can swap backgrounds in seconds while knowing your images for masking will blend seamlessly into the new environment every single time. Consistent use of layer masks ensures your team can make quick edits without starting the project over, making the masking in image processing stage highly efficient and reliable. A professional masking workflow also includes steps for shadow preservation. When you mask a photo, you often lose the natural shadows that make the object look grounded. Expert editors use clipping masks to recreate these shadows on a separate layer, ensuring your images for masking don't look like they are "floating" in mid-air. This deep analytical focus on composite imagery is what U.S. clients expect from a top-tier service provider.
Why is foreground recovery vital for images for masking?
When you work on images for masking, you often lose subtle details during the initial cutout phase. Foreground recovery techniques allow you to bring back those lost pixels, such as individual hairs or the fine mesh of a speaker.
-
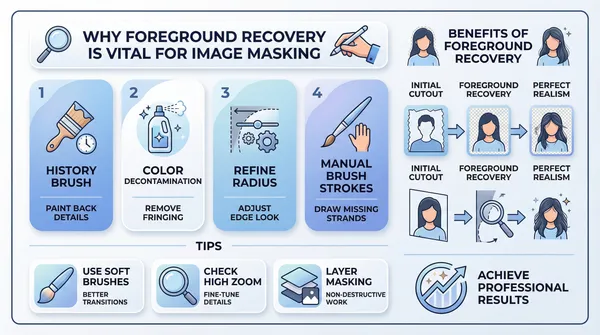
- Use the History Brush: Paint back original details into your masked areas.
- Apply Color Decontamination: Remove "fringing" from the edges of your subjects.
- Refine the Radius: Adjust how far the mask looks for edge data.
- Manual Brush Strokes: Sometimes you must hand-draw missing strands for perfect realism.
These advanced moves ensure your images for masking look authentic and professional. High-quality foreground recovery is the secret sauce that makes our jewelry and fashion retouching services stand out. It ensures your composite imagery looks like a single, untouched photograph rather than a digital construction, even after a heavy and complex masking workflow session. When you perform foreground recovery, you are essentially rebuilding the soul of the image. This is especially true for images for masking that involve transparent fabrics or intricate jewelry. Without this step, your image masking will look flat and unconvincing. By using the Refine Edge tool in combination with manual brushing, you can achieve a level of masking in image processing that is indistinguishable from reality. This is the expertise that ClippAsia brings to every images for masking project we handle.
How do you finalize your images for masking?
Before you export your work, you must double-check the mask against various background colors. A mask might look perfect on white but show terrible jagged edges on a black or colored backdrop.
Clean up any stray pixels that might be floating around the main subject. Once your images for masking are polished, save the file with layers intact so you can make quick adjustments to your vector masks if your client requests a change later. A clean final check is the hallmark of a professional masking workflow that values image masking accuracy above all else. During the finalization of images for masking, you should also check for "fringe" or "halo" effects. These are common issues in masking in image processing where the old background color peeks through the edges. We use advanced clipping masks and color decontamination to wipe these away instantly. Ensuring your images for masking are versatile is key for U.S. e-commerce sites that use different background colors for their product pages. This final step guarantees that your mask a photo effort was worth every second of post-processing.
Frequently Asked Questions
What is the typical turnaround time for complex masking?
We usually deliver high-quality masked images within 12 to 24 hours. Large bulk orders may take slightly longer depending on the intricacy of the edges. We always prioritize meeting your specific deadlines for images for masking.
Which file formats do you accept for image masking?
You can send us JPG, PNG, TIFF, or PSD files. We prefer high-resolution RAW files to get the best results for images for masking. We return the files in your requested format for your clipping masks.
Do you offer a quality guarantee for your services?
Yes, we provide a 100% satisfaction guarantee on all our work. If you are not happy with the edges, we will redo them for free. Our goal is to make your images for masking look perfect.
Can you handle thousands of images for masking per day?
Our large team of experts can process over 3,000 images every 24 hours. We use a streamlined masking workflow to maintain consistency across every single photo. You get professional results even at high volumes.
Do you provide a free trial for new customers?
We offer two free test images so you can see our quality firsthand. This allows you to test our images for masking expertise before committing to a large project. Simply contact our team to start your trial.
Trust ClippAsia for your professional images for masking
Choosing the right partner for your post-processing needs makes a world of difference in your sales. ClippAsia specializes in complex images for masking that help your products shine in the competitive U.S. market.
Visit our website to see our full range of services. You can also reach us directly via the contact details below for a custom quote. Let us handle your images for masking while you focus on growing your business! Our team is dedicated to providing the best image masking results in the industry. Whether you need layer masks, clipping masks, or advanced vector masks, we have the tools and experience to deliver. Don't settle for average composite imagery when you can have the best. Contact us today to see how we can transform your images for masking into high-performing marketing assets.
Contact Information
- Email: info@clippasia.com
- Phone Number: 880 1911-862115
- Get a Quote: https://clippasia.com/get-quote