How to Photograph a White Product on a White Background for Stunning eCommerce Images
Capturing a white product on a white background is a staple in eCommerce photography, especially for jewelry, fashion, and catalog imagery. This clean, professional look highlights your product's details and ensures it stands out on platforms like Amazon, Shopify, or your brand's website.
However, achieving that crisp, seamless white-on-white aesthetic can be tricky due to lighting challenges, color casts, and reflections. At ClippAsia, we specialize in transforming product images with services like jewelry retouching, high-end retouching, and background removal. In this guide, we'll walk you through the process of photographing white products on a white background and show how our expertise can elevate your visuals.
Why White-on-White Photography Matters
White-on-white photography creates a timeless, distraction-free look that's ideal for:
- eCommerce platforms: Clean images enhance product focus and improve conversion rates.
- Catalogs: Consistent visuals build brand trust and professionalism.
- Marketing materials: Versatile images work across websites, social media, and print.
However, challenges like overexposure, shadows, and reflective surfaces can make this technique daunting. Let's break down the steps to get it right.
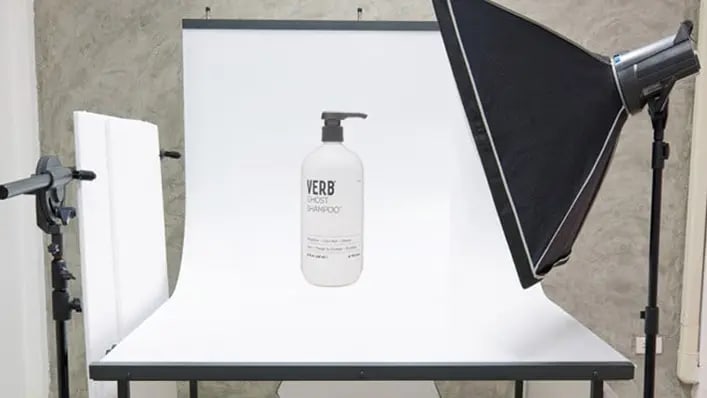
Step 1: Set Up Your Equipment
To achieve professional results, you'll need the right gear. Here's what we recommend:
- Camera: A DSLR or mirrorless camera offers superior control.
- Lens: A 50mm or 85mm prime lens is great. For small items like jewelry, a macro lens ensures intricate details are captured.
- Lighting: Softbox lights or LED panels create soft, even illumination.
- Background: A white backdrop or lightbox ensures a seamless background.
- Tripod: Stabilizes your camera for sharp images.
- Gray Card: Helps set custom white balance.
- Light Meter: Ensures accurate exposure.
Pro Tip: Tethered shooting with software like Capture One or Lightroom lets you preview images in real-time.
Step 2: Master Your Camera Settings
Getting the right camera settings is crucial for white-on-white photography. Here's how to optimize:
- Manual Mode (M): Control ISO, aperture, and shutter speed.
- ISO: Keep it low (100-200).
- Aperture: Use f/8 to f/11 for depth of field.
- Shutter Speed: Adjust based on lighting.
- White Balance: Set a custom white balance using a gray card.
- RAW Format: Shoot in RAW for flexibility.
- Exposure Compensation: Slightly overexpose.
- Focus: Use single-point or manual focus. For detailed shots, try focus stacking.
Step 3: Perfect Your Lighting Setup
Lighting is the heart of white-on-white photography. The goal is to create soft, even illumination while avoiding overexposure.
- Key Light: Softbox or diffused LED at 45-degree angle.
- Fill Light: Reflector or secondary light to soften shadows.
- Background Light: Light the backdrop separately for a pure white (RGB 255, 255, 255).
- Edge Lighting/Rim Lighting: Add backlight for reflective products like jewelry.
- Diffusion: Use diffusers to soften light.
- Black Flag: Block unwanted reflections.
Pro Tip: Avoid ring lights for reflective surfaces to prevent circular catchlights.
Step 4: Compose Your Shot
Composition enhances visual appeal. Consider:
- Rule of Thirds: Slightly off-center composition.
- Leading Lines: Use shapes or shadows.
- Negative Space: Leave room around the product.
- Aspect Ratio: Shoot for platform-specific requirements.
Use an acrylic sheet for reflective products to create subtle reflections.
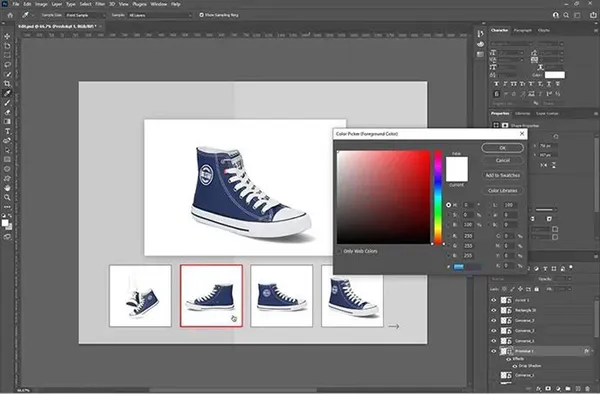
Step 5: Post-Processing for Perfection
Even with a great setup, post-processing is essential. Use Lightroom, Photoshop, or Capture One:
- White Balance Adjustment: Correct color casts.
- Exposure and Contrast: Adjust highlights and shadows.
- Retouching: Remove blemishes or dust. For jewelry, enhance sparkle with dodge/burn. Use our jewelry retouching service for premium results.
- Background Cleanup: Ensure pure white using masks or brushes. Our background removal services can handle complex edits.
- Sharpening: Apply a high pass filter.
- Cropping: Match platform aspect ratios.
Step 6: Address Common Challenges
Here's how to handle typical white-on-white issues:
- Overexposure: Check histogram, adjust lighting.
- Color Casts: Use a gray card, correct in post.
- Reflections: Use diffusers and black flags.
- Lack of Contrast: Add rim lighting or adjust curves.
- Shadows: Use fill lights or reflectors.
For complex cleanups, our clipping path services provide precision.
Why Choose ClippAsia for Your Product Photography Needs?
Photographing white products on a white background requires precision. At ClippAsia, we simplify this process with expert services like:
- Jewelry Retouching: Enhance sparkle, perfect reflections.
- High-End Retouching: Magazine-quality results.
- Clipping Path Services: Isolate products precisely.
- Background Removal: Clean, eCommerce-ready backgrounds.
- Fashion Photos Editing: Elevate apparel imagery with expert retouching.
We understand the nuances of white-on-white photography and deliver images that drive sales.
Mastering white-on-white photography can transform your eCommerce visuals, but it demands attention to detail. From lighting and settings to editing, every step counts. If you're looking to streamline the process, ClippAsia is here to help. Our expert team ensures your products shine across all platforms.
Ready to elevate your product photography? Explore our services and let us help you create images that convert!