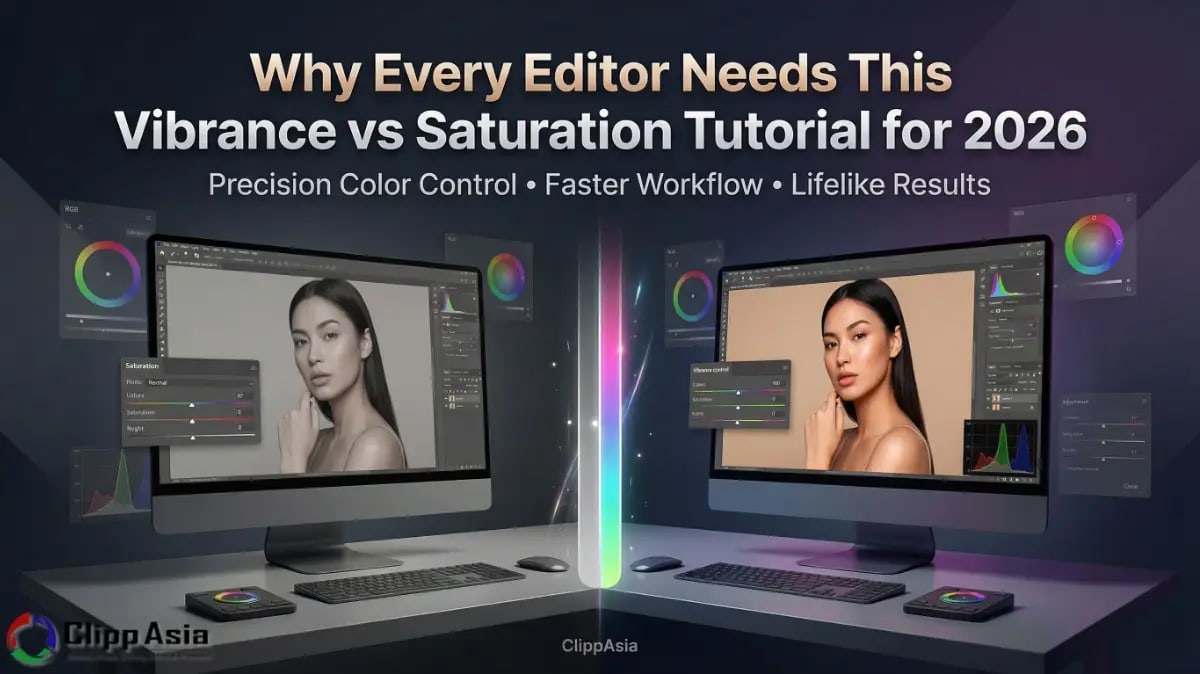
Why Every Editor Needs This Vibrance vs Saturation Tutorial for 2026
ClippAsia offers professional color correction services specifically for U.S. E-commerce businesses and portrait photographers. We provide this comprehensive vibrance vs saturation tutorial to help you achieve lifelike colors in your digital assets. Our high-end editing solutions offer an immediate value proposition by saving you hours of trial and error while boosting brand appeal.
Do You Struggle with Neon Skin or Dull Landscapes in Your Edits?
Do your photos often look too orange or completely lifeless after editing? Many editors find it difficult to balance color intensity without ruining the subject. You might notice that your greens look fake or your reds bleed everywhere. These common headaches happen when you lack a clear vibrance vs saturation tutorial strategy. You need a better way to make your product colors rich without losing detail. Most American buyers prefer natural-looking images over heavily filtered and artificial ones. If you push the wrong slider, you risk losing customer trust and professional credibility.
Misunderstanding the vibrance definition photo editing standards often leads to embarrassing oversaturated skin tones in your portraits. This mistake makes your human models look unnatural and drives away high-end U.S. clients quickly. We know you want your photos to feel warm and inviting to shoppers. A simple vibrance vs saturation tutorial provides the clarity you need for consistent, high-quality work. You can stop guessing which tool is best for your specific lighting scenario. Our expert advice ensures your colors stay within safe printing limits for physical catalogs. This vibrance vs saturation tutorial acts as your roadmap to much cleaner and professional edits. High-end portrait color correction requires this level of precision. Learn More.
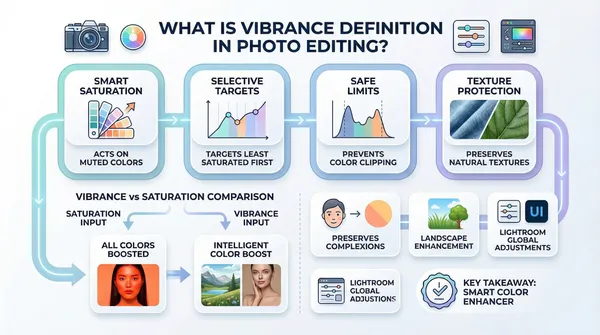
What is the True Vibrance Definition in Photo Editing Today?
You must understand how these digital tools behave differently within your editing software. Our vibrance vs saturation tutorial breaks down these complex technical concepts into easy steps. Knowing the correct vibrance definition photo editing logic is the first step toward mastery.
- Smart Saturation: Vibrance acts as a smart tool for muted colors.
- Skin Protection: It avoids increasing the intensity of orange and yellow hues.
- Selective Saturation: It targets the least saturated parts of your image first.
- Landscape Depth: Use it to add life to grass and sky naturally.
- Safe Limits: It prevents color clipping in highly saturated areas effectively.
- Vibrance in Photography: This tool preserves the natural texture of your subject.
- Adobe Lightroom: The Lightroom Vibrance slider is perfect for global adjustments.
This logic makes the vibrance slider Photoshop tool very powerful for your creative projects. You can push the colors further without breaking the delicate image pixels. Our vibrance vs saturation tutorial shows you exactly when to stop for realism. You will see a huge difference in your portrait color correction tasks immediately. Professionals in the USA rely on these subtle shifts for premium quality work. This vibrance vs saturation tutorial ensures you use the tool correctly for every single photo. Utilizing smart saturation in Lightroom helps maintain a natural aesthetic across large galleries.
Why is This Vibrance vs Saturation Tutorial Better for Your Workflow?
You deserve a workflow that saves time and produces amazing results. Using the wrong tool can double your editing time with manual fixes. This vibrance vs saturation tutorial teaches you to work smarter, not harder. You will learn to identify color needs at a single glance.
Saturation increases every single color in your image at the same rate. This often causes "blooming" where fine details disappear into a solid color blob. Our vibrance vs saturation tutorial explains why this is dangerous for product photography. If you sell a red shirt, you need the texture to stay visible. If the red is too strong, the buyer cannot see the fabric. Using selective saturation allows you to keep that vital texture while keeping the color bright. Correcting oversaturated skin tones is much easier when you use the right sliders from the start.
|
Feature |
Saturation Tool |
Vibrance Tool |
|
Primary Goal |
Uniform color boost |
Smart color boost |
|
Best For |
Desaturation |
Portrait color correction |
|
Skin Tones |
Often ruins them |
Protects skin hues |
|
Algorithm |
Linear / Aggressive |
Non-linear / Intelligent |
Following this vibrance vs saturation tutorial helps you choose the right path for your edit. Most beginners use saturation when they should really be using the vibrance slider Photoshop offers. This simple change will make your portfolio look much more professional to U.S. agencies. We recommend starting with a low vibrance boost before touching the saturation slider. This vibrance vs saturation tutorial methodology protects the integrity of your original digital file. You will avoid the dreaded "digital look" that ruins high-end e-commerce visuals. Properly editing landscapes and sunsets requires this careful balance between the two unique tools. If you want more information on this topic, here is an article you can read about “Colorfulness” by simply clicking here.
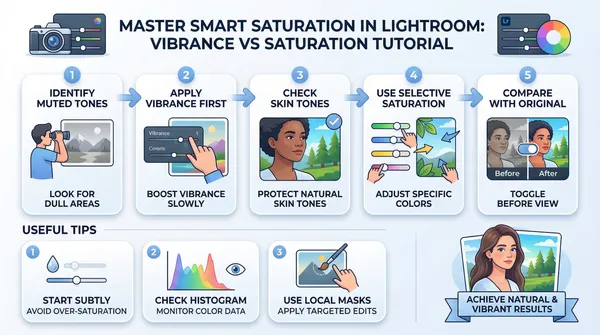
Master Smart Saturation in Lightroom with This Vibrance vs Saturation Tutorial
Mastering smart saturation in Lightroom requires a delicate hand and a good eye. You should look for the colors that are currently lacking life in your shot. Move the Lightroom Vibrance slider slowly to see which areas respond the best. You will notice that the sky and trees become vivid before the skin does. This vibrance vs saturation tutorial tip is the secret to high-end wedding and portrait work. Effective portrait color correction starts with identifying these specific color gaps in the raw data.
- Identify Muted Tones: Look for parts of the image that seem gray.
- Apply Vibrance First: Use the Lightroom Vibrance slider to fill those gaps.
- Check Skin Tones: Ensure your subject does not look like they have a tan.
- Use Selective Saturation: Only boost specific colors like blue or green manually.
- Compare with Original: Always toggle the "Before" view to ensure natural results.
By following these steps, you avoid creating oversaturated skin tones that look amateurish. Your U.S. clients want to see realistic colors that represent their products accurately. This vibrance vs saturation tutorial ensures your colors are bold but still very honest. If you need to remove color, use desaturation on specific channels instead of globally. This keeps the rest of your image looking healthy and full of life. Our vibrance vs saturation tutorial makes smart saturation in Lightroom easy for everyone to use. Remember that vibrance in photography is about finding the perfect harmony between colors.
Why Does Vibrance in Photography Matter for Landscapes?
When editing landscapes and sunsets, you often deal with very wide color ranges. The sun might be very bright while the foreground remains dark and gray. A vibrance vs saturation tutorial is essential for balancing these two extremes perfectly. You want the sunset to glow without making the grass look neon green.
Using vibrance in photography allows you to bring up the dull foreground colors safely. It respects the already bright colors in the sky while helping the shadows. This vibrance vs saturation tutorial technique creates a balanced and professional landscape image. American photographers use this to create those stunning, airy photos seen in travel magazines. You can achieve this same look by following our expert vibrance vs saturation tutorial guide. It prevents the image from looking "fried" or over-processed during the final export. Applying vibrance slider Photoshop adjustments can also enhance specific highlights in the clouds.
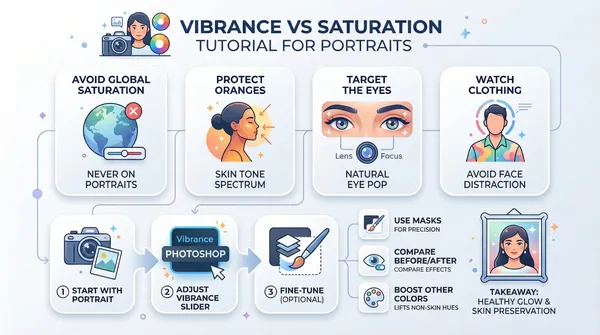
Applying the Vibrance Slider Photoshop Tool via This Vibrance vs Saturation Tutorial
Portraits are the most difficult images to edit because humans are very sensitive to skin. If the skin color is off by even 1%, the whole photo feels wrong. This vibrance vs saturation tutorial teaches you to prioritize the human element above all. Use the vibrance slider Photoshop tool to add a healthy glow to the scene. Precision in portrait color correction is what separates professionals from hobbyists in the competitive U.S. market.
- Avoid Global Saturation: Never use it as your first move on a person.
- Protect the Oranges: Skin lives in the orange and yellow spectrum mostly.
- Target the Eyes: Use vibrance in photography to make eye colors pop.
- Watch the Clothing: Ensure the outfit does not distract from the face.
By focusing on these points, you achieve a professional portrait color correction every single time. Our vibrance vs saturation tutorial ensures your subjects look their absolute best for their brands. High-end fashion houses in New York and L.A. demand this level of precision. Following a vibrance vs saturation tutorial helps you meet those elite industry standards easily. You can turn a flat studio shot into a vibrant magazine cover with ease. Even the Lightroom Vibrance slider can be used as a targeted brush for localized corrections.
What is the Role of Desaturation in This Vibrance vs Saturation Tutorial?
Sometimes the best move you can make is to take color away. Desaturation helps you focus the viewer's eye on the most important part of the photo. This vibrance vs saturation tutorial isn't just about adding color, it is about balance. You can desaturate distracting background elements to make your product stand out.
This creates a clean, minimalist look that is very popular in modern American advertising. Using selective saturation allows you to keep the product bold while cooling the background. Our vibrance vs saturation tutorial shows you how to use this contrast for better sales. You will find that less color often leads to a more expensive-looking image. Expert editors use desaturation to fix color spills from green screens or messy lighting. This makes your vibrance vs saturation tutorial knowledge a complete toolkit for any editing challenge. Avoiding oversaturated skin tones often requires subtle desaturation of specific red or yellow channels.
Frequently Asked Questions
How fast can ClippAsia handle my color correction order?
We deliver most professional color correction projects within 12 to 24 hours. Our team works around the clock to meet your tight marketing deadlines. You receive high-quality vibrance vs saturation tutorial results without waiting for days.
What file formats do you need for professional editing?
We highly recommend sending us RAW or high-resolution TIFF files for the best results. These formats hold the most color data for our vibrance vs saturation tutorial techniques. We can also work with high-quality JPGs if that is all you have.
Do you offer a guarantee for portrait color correction work?
Yes, we provide a 100% satisfaction guarantee on every single image we edit. If you are not happy with the skin tones, we redo them. Our goal is to make your vibrance vs saturation tutorial experience perfect.
Can your team fix oversaturated skin tones from my original?
Our experts can easily reverse bad editing to restore natural and healthy skin. We use advanced desaturation and color balancing tools to fix your photos. This vibrance vs saturation tutorial expertise is what makes us a top choice.
Do you provide a free trial for E-commerce product editing?
We offer two free test images so you can see our quality. You can upload any product shot to see our vibrance vs saturation tutorial skills. Simply contact our team to start your free trial today.
Master Your Edits with This Vibrance vs Saturation Tutorial and ClippAsia
Choosing ClippAsia means you get more than just a simple edit for your brand. We apply this vibrance vs saturation tutorial knowledge to every single image we process. Your product photos will look stunning, realistic, and professional for the U.S. market. We understand the fine line between vibrant and fake in modern photography. By mastering selective saturation, we ensure your products look authentic and appealing to every potential buyer.
Visit our website at clippasia.com to see our full service list today. You can also email us at info@clippasia.com or use our Contact Link for a quote. Let us handle your color correction while you focus on growing your store! This vibrance vs saturation tutorial is just the beginning of what we can do. Our team is ready to deliver the high-end visuals your business truly deserves. With expert portrait color correction, your marketing imagery will stand out in any digital landscape.
Contact Information
- Website: https://clippasia.com
- Email: info@clippasia.com
- Contact Us: https://clippasia.com/contact